April 30, 2012

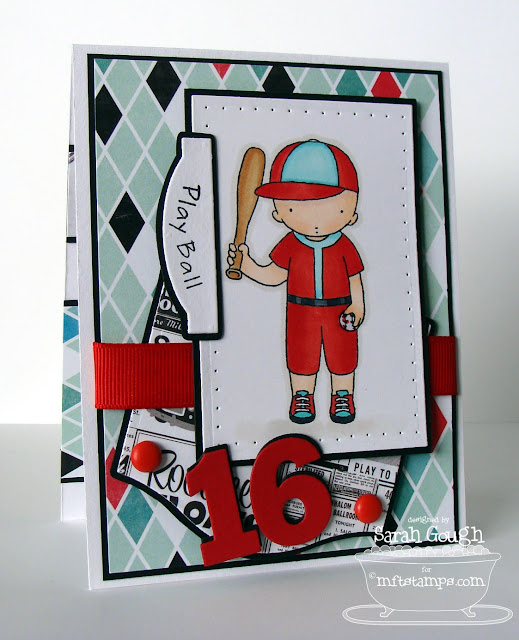
Baseball Boy


It's Pure Innocence teaser day at My Favourite Things! As usual, there are five adorable new sets being released in May. Today I'm previewing Baseball Boy.


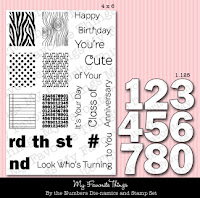
I stamped my little guy on a panel cut with the new Rectangle STAX. Behind the image I've used a panel cut from the Designer Label 1 STAX - I can NOT put these down! I curved my sentiment before stamping on the Mini Tab Die-namics. By the Numbers provided the perfect accent for this boyish card.


Inside I've shadow stamped the image and added a second sentiment from the set. I think this is the perfect set for a boyish birthday!


Here are the details about the upcoming release on May 1 at 10 PM EST:
  • You can attend the New Release Party on May 1 from 8-10 PM EST HERE in the MFT forum, where you can enjoy fun, games, and PRIZES!
  • The MFT release, including all new stamp sets and Die-namics, is on May 1 at 10 PM EST.  You'll find all the newest products HERE at release time.
  • The guest designer contest is ON!  Check out the forum for details on how YOU can win $200 in stamp sets and Die-namics, and play along with the MFT Design Team for a month.
  • If you'd like to see all the teasers for today, please click on over to the MFT Blog NOW.  Be sure to leave comments as you go for the chance to win one of 2, $10 gift certificates given away daily.  The winners will be posted on May 1 just before the release party, on the MFT blog.
Here are the Die-namics I've used today:

 Thanks for stopping by!
 Stamps: PI - Baseball Boy (MFT Stamps) Paper: Happy Days (Echo Park) Ink: Tuxedo Black (Memento) Going Gray (SU) Dies: Designer Labels 1 STAX, Rectangle STAX, Mini Tabs Foursome, By The Numbers Die-namics (MFT Stamps) Other: Jumbo Brads, Piercing Tool, Ribbon, Copic Markers

April 29, 2012

UR Fabulous!


We're halfway through My Favorite Things teasers for the May release, and today there are two a la modes to introduce you too! I've used I've Got UR Back today, this is a really fun set to paper piece or colour!


I took the image, pieced the letters and cut out all the individual parts so I could rearrange them anyway I wanted on my oval layer. My girl is popped up on pieces of foam boosters. I curved the sentiment on my clear block and stamped it to match the curve of her leg. The card itself is pretty simple, I decorated with a couple of Butterflies Die-namics, edged with Stickles and finished with Rhinestones.


Inside I've used the Designer Labels 1 STAX as my main layer. The Squiggle Border Die-namic edges my paper and the sentiment is from the other new set being teased today - Lightbulb Moment.

 
Here are the details about the upcoming release on May 1 at 10 PM EST:
  • You can attend the New Release Party on May 1 from 8-10 PM EST HERE in the MFT forum, where you can enjoy fun, games, and PRIZES!
  • The MFT release, including all new stamp sets and Die-namics, is on May 1 at 10 PM EST.  You'll find all the newest products HERE at release time.
  • The guest designer contest is ON!  Check out the forum for details on how YOU can win $200 in stamp sets and Die-namics, and play along with the MFT Design Team for a month.
  • If you'd like to see all the teasers for today, please click on over to the MFT Blog NOW.  Be sure to leave comments as you go for the chance to win one of 2, $10 gift certificates given away daily.  The winners will be posted on May 1 just before the release party, on the MFT blog.
Here are the Die-namics I've used today:
 

Thanks for stopping by!
 Stamps: à la modes - I've Got UR Back (MFT Stamps) Paper: Madeline (Prima) Ink: Tuxedo Black (Memento) Pumice Stone (Ranger) Dies: Oval STAX, Designer Label 1 STAX, Oval Dainty Doily, Squiggle Border, Butterflies Die-namics (MFT Stamps) Other: Melon Mambo Ribbon, Piercing Tool, Stickles, Copic Markers

April 28, 2012

Vertical Greetings II


I know My Favorite Things fans are going to be excited to see today's teasers - Vertical Greetings is one of my all time faves, and now we're bringing you Vertical Greetings II!

I went all girly with my card, using lots of sponging, felt flowers and pearls for a lush look.


I've sponged the edges with Antique Linen and Old Paper distress ink. The Little Open Scallop Strip Die-namics was perfect for the girly look I was going for. I've also used the new Mini Royal Roses Die-namic in Blue, White and Bubblegum felt from MFT. The ribbon is Sno Cone (I love MFT ribbon!)


I've used another sentiment from the set on the inside of my card and repeated the border.


Here are the details about the upcoming release on May 1 at 10 PM EST:
  • You can attend the New Release Party on May 1 from 8-10 PM EST HERE in the MFT forum, where you can enjoy fun, games, and PRIZES!
  • The MFT release, including all new stamp sets and Die-namics, is on May 1 at 10 PM EST.  You'll find all the newest products HERE at release time.
  • The guest designer contest is ON!  Check out the forum for details on how YOU can win $200 in stamp sets and Die-namics, and play along with the MFT Design Team for a month.
  • If you'd like to see all the teasers for today, please click on over to the MFT Blog NOW.  Be sure to leave comments as you go for the chance to win one of 2, $10 gift certificates given away daily.  The winners will be posted on May 1 just before the release party, on the MFT blog.
Here are the Die-namics I've used today:


 Stamps: Vertical Greetings II (MFT Stamps) Paper: Blush (MME) Ink: Tuxedo Black (Memento) Rose Red (SU) Dies: Little Open Scallop, Vertical Greetings II, Mini Royal Roses Die-namics (MFT Stamps) Other: MFT Ribbon and Felt, Zva Pearl Flourish

April 26, 2012

Inspired by Trees


It's day two of MFT teasers and today I have a card using the newest Inspired By set - Inspired by Trees. I went for a vintage feel with my card, using a cut out panel to highlight the focal image.


This card is a large 5x5" square. I used Circle STAX to create the cut-out panel that frames the beautiful focal image. Shading doesn't come naturally to me, so I love that these images have shading built in - just go darker in the darker areas and you're set!


I've used the new Large Royal Rose Die-namic to anchor my sentiment, which is stamped on a Fishtail Flags STAX. To give my rose detail, I first sponged with Antique Linen distress ink, then edged with Chocolate Chip ink before adding some stickles for shine.


Inside I simply stamped one of the tree images three times. I edged my paper with the new Mini Scallop Edge - I love the professional finished look this little Die-namics gives!


Here are the details about the upcoming release on May 1 at 10 PM EST:

  • You can attend the New Release Party on May 1 from 8-10 PM EST HERE in the MFT forum, where you can enjoy fun, games, and PRIZES!
  • The MFT release, including all new stamp sets and Die-namics, is on May 1 at 10 PM EST.  You'll find all the newest products HERE at release time.
  • The guest designer contest is ON!  Check out the forum for details on how YOU can win $200 in stamp sets and Die-namics, and play along with the MFT Design Team for a month.
  • If you'd like to see all the teasers for today, please click on over to the MFT Blog NOW.  Be sure to leave comments as you go for the chance to win one of 2, $10 gift certificates given away daily.  The winners will be posted on May 1 just before the release party, on the MFT blog.
Here are the Die-namics I've used today:


 Thanks for stopping by!
Stamps:Inspired by Trees (MFT Stamps) Paper: Portobello Road (MME) Ink: Tuxedo Black (Memento) Chocolate Chip (SU) Dies: mini Scalloped Edge, Fishtail Flags STAX, Royal Leaves, Large royal Rose Die-namics (MFT Stamps) Other: Crochet Ribbon, Jumbo Brads, Stickles Copic Markers

April 25, 2012

You A-mews Me!


It's that time again! The My Favorite Things team are starting up teasers for the May release, and as usual, we have some gorgeous stamps and Die-namics to share!

First up today I have a sample using the newest Claire Keay set - You A-mews Me! I just love these cute little guys!


Isn't that image the cutest!? You'll also spot two new Die-namics on my card, the squiggle border and Designer Labels 1 STAX - love this shape! I've also used Mix and Match Banners.


I'm a sucker for a good font, and I love the one used on these sets! I've finished off the inside of my card simply with a sentiment and paper scraps.


Here are the details about the upcoming release on May 1 at 10 PM EST:
  • You can attend the New Release Party on May 1 from 8-10 PM EST HERE in the MFT forum, where you can enjoy fun, games, and PRIZES!
  • The MFT release, including all new stamp sets and Die-namics, is on May 1 at 10 PM EST.  You'll find all the newest products HERE at release time.
  • The guest designer contest is ON!  Check out the forum for details on how YOU can win $200 in stamp sets and Die-namics, and play along with the MFT Design Team for a month.
  • If you'd like to see all the teasers for today, please click on over to the MFT Blog NOW.  Be sure to leave comments as you go for the chance to win one of 2, $10 gift certificates given away daily.  The winners will be posted on May 1 just before the release party, on the MFT blog.
Here are the Die-namics I've used today:

  Thanks for stopping by!
Stamps: Claire Keay - You A-mews Me (MFT Stamps) Paper: Happy Go Lucky (MME) Ink: Tuxedo Black (Memento) Dies: Squiggle Border, Designer Labels 1 STAX, Mix & Match Banners Die-namics (MFT Stamps)  Other: Jumbo Brads, Piercing Tool, Circle Punch, Copic Markers

April 24, 2012

Creative Chat: Copic Markers


Today the MFT team are talking Copics! I'll show you how I store mine, and give you some of my fave colour combos.

I get asked a LOT where I bought my copics, as they are SO expensive in New Zealand. I bought mine in the 72 sets of Ciao markers from E-bay. Bought this way, they cost $4 per marker (including shipping) versus the $8 they generally cost in NZ stores. I filled a couple of gaps with Sketch marker colours, but mostly have Ciao.


This is my Copic storage. I have five of these Fiskars holders. I got mine at Spotlight and paid between $10 and $20 for each set. I love how easily portable they are and sometimes move them into the living room if I'm going to be doing a lot of colouring in front of the TV.


The thing I really like about these holders is being able to remove individual cups. I have all my Copics in front of me on a shelf on my desk, and I generally just reach for the colour family I need at the time. It saves a lot of room on my workspace.


The big downside to Ciao markers is the lack of labelling on the ends. I labelled mine using a label maker and 1/4" Circle punch. I created the labels using the smallest font size, typing out the labels with a few spaces between each one until I hit the character limit on the label maker. After printing I simply punched them out and adhered to my Copics. The 1/4" circles fit on the caps exactly.

I get asked about colour combos a lot as well. Below are three of my faves for colouring a la mode and Pure Innocence images. If you are just starting out with Copics, any of these combos would be really useful.


My go-to hair combo. I really need to practice with some other combos so I stop using this one so much! I generally colour the hair last and always just reach for what I know works.


Skin combo #1.


Skin combo #2. I don't have any rules about which one I use for certain images, it just depends on what I feel like that day!

Head on over to Kim's blog to see other tips and tricks from the team!

 Thanks for stopping by!